All posts by Webmaster

LED Lighting

I am in the process of changing out the G4 halogens down below for LEDs.
Someone suggested Sailor’s Solutions, www.sailorssolutions.com and the
Admiral and I are very pleased with the bulbs that you can find at this
link.

http://www.sailorssolutions.com

The Admiral and I both agreed that if one measured the lumens between the
halogen and the ZED01 Miniature Warm White LED Replacement Bulb ZED01 shown on the link above, the halogen might be a bit softer, but it was hard for us
to tell the difference. The really good news is that they are easy to
install and saved us from having to buy new overhead fixtures. They are
also flat enough to be installed behind the “shell” shades on the bulkhead
fixtures.

Regards,
Bruce Overbay
Our Water View, #226

You need to be logged in to see the rest of this content.  Catalina380-IA members, please login.

To join please fill out a membership application (Association->Membership Application) and send a check to the address on the form.

Led Lights, T- molding

Over the winter I replaced the overhead spots with LED spots. The ones I used were purchased from Amazon and are “Torchstar” 4 watt, MR16, 3200K, warm white. I am very happy with them and they cost $7.50 each. The bulbs stuck out about a 1/4″ and I had to make a small mod to the ficture to make them flush when installed but not alot of effort.

It is interesting the fixtures are rated at 10 watts, which is printed on them, and the bulbs that were in them were all 20 watts.

I also replaced the G4 base bulbs in the clamshell bulkhead lights with LED’s available at Bulbs.com. Item 770510, G4 base, 0.6 watt, warm white, at $7.69.

I also needed to replace the “T” molding around the wet locker in the shower. I bought 40 feet of it from “T-molding.com” 9/16″ white, flat, nintendo, for $20.00.

You need to be logged in to see the rest of this content.  Catalina380-IA members, please login.

To join please fill out a membership application (Association->Membership Application) and send a check to the address on the form.
My Girl Modifications

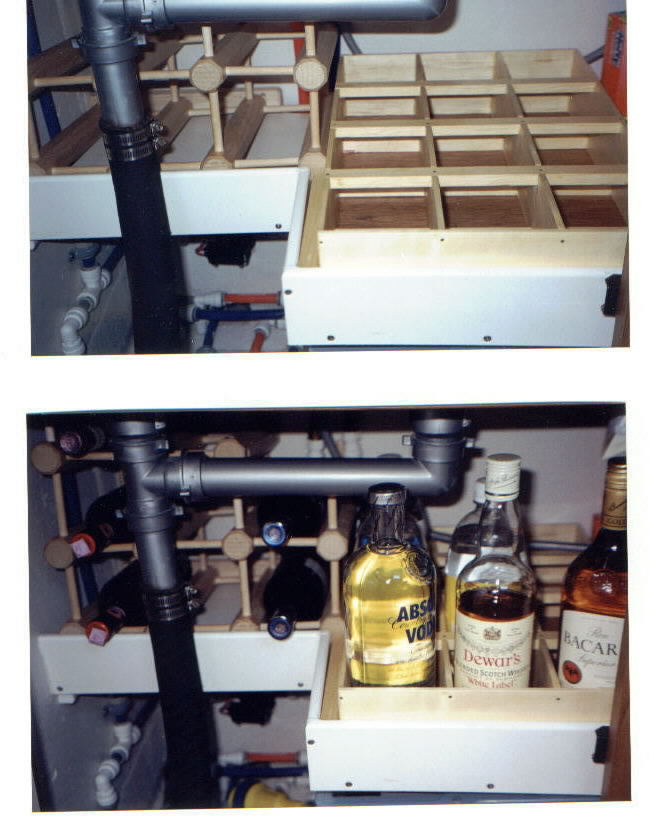
I converted the shelf under the sink on “My Girl” #213 to a secure 6 bottle wine rack, with appropriate inclination, and 12 bottle divided bottle storage area.  The insert is removable if needed, but is very seaworthy in protecting the valuable contents thereof.

I created removable storage bins for the right cabinet of “My Girl” #213 to protect and organize the various cooking utensils.  The upper bin locks in place with the shelf lip while the lower extends out to the cabinet door.  The upper bin is divided so that sharps are isolated.  I also put a divider in the two standard drawers for silverware.


You need to be logged in to see the rest of this content.  Catalina380-IA members, please login.

To join please fill out a membership application (Association->Membership Application) and send a check to the address on the form.
Bimini and Dodger — Discussion

I need a new bimini and dodger. On the dodger I do not want the “wavy” flex ‘glass’… As that is my visibility to the bow…
I got some quotes which I found to be very high, has anyone gotten this done recently? What is a average ballpark number that I can expect to pay?

$2000 for the dodger with 60 gauge polycarbonate in forward 3 panels.
$1540 for binimi
$615 for matching main sail cover
$425 for zipper connector between bimibi and dodger

This is all using the existing frame layout.

Does that seem reasonable? Seems high to me…

Comments?

-Ken


c380 #176


Ken,

I’ve been making canvas for just over four years, including the frames. I’ve made three bimini’s, two dodgers, a full enclosure, several dinghy covers, and lots of other covers, bags, etc. I’ve spent a number of years studying(emulating) the best canvas makers in our

You need to be logged in to see the rest of this content.  Catalina380-IA members, please login.

To join please fill out a membership application (Association->Membership Application) and send a check to the address on the form.
Installing Larger Battery Charger

When my original 40 amp Charles Charger quit working, I installed a Xantrex TrueCharge2 60 amp charger to better deal with my larger than original house battery bank.  In the process of doing this, along with help from other members of the group, I realized that there was more to the process than I originally planned.  Here is the resulting issue list that one should consider before getting into this project:

  • Upgrading the charger will probably mean upgrading the battery cables from the charger to the batteries.  Mine were originally #4 but the 60 amp charger required fishing #1 cable.  This makes a huge difference to the complexity and cost of the project and may have discouraged my installation of the larger charger in the first place.
  • Newer chargers require fishing a new wire for the battery temperature sensor.  Compared to fishing larger electrical cable, this was nothing.
  • Expect the

You need to be logged in to see the rest of this content.  Catalina380-IA members, please login.

To join please fill out a membership application (Association->Membership Application) and send a check to the address on the form.

Checking Battery Cable Integrity

The following comes from Warren:

To check condition of any moderate-to-high current leads/connections, I like the measure-voltage-drop method. Eg: at battery terminal[s], put one vm lead on battery terminal itself & other lead on wire or connecting [crimped?] lug; do this while heavy charge/current is flowing.  Any more than maybe 0.1 volt = time to fix/clean/tighten.

Can do same type of test over entire cable as long as you can rig a long [thin ok] voltmeter lead to charger, but you’d need to check allowable drop [maybe 3%?] to know what is acceptable.

You need to be logged in to see the rest of this content.  Catalina380-IA members, please login.

To join please fill out a membership application (Association->Membership Application) and send a check to the address on the form.

Engine Differences across C380 and C387

Previous posts have given specifications for the two different Yanmar engines used in the C387 series.  Warren has provided below some additional interesting information on engine and transmission differences across the C380-C387 series….

Tom

Should you want to delve further into engine differences, –in this case between the two boats—one design fact that has baffled me is why the two engines [in this case: 3, but the 2 Yanmars have the same trend] have opposite-trending fwd/rev gear ratios.

Specifically, the Westerbeke 42b has 2.63/1.95 fwd/rev gearing, while the Yanmars [JH3] has 2.61/3.16 fwd/rev reduction ratios!!??

It looks like Westerbeke realizes that owner/operators want to operate at low RPM’s in reverse, but Yanmar believes operators like to operate near the same throttle for both directions???

Have asked a couple of “experts”, but no definitive answer.  Perhaps Tim has some thoughts on this.

To carry this a bit further, I see that

You need to be logged in to see the rest of this content.  Catalina380-IA members, please login.

To join please fill out a membership application (Association->Membership Application) and send a check to the address on the form.

Yanmar Engine for C385

The 385 will be arriving with the 3JH5E Yanmar.

You need to be logged in to see the rest of this content.  Catalina380-IA members, please login.

To join please fill out a membership application (Association->Membership Application) and send a check to the address on the form.

Yanmar 3JH4 Engine Specifications (C387)

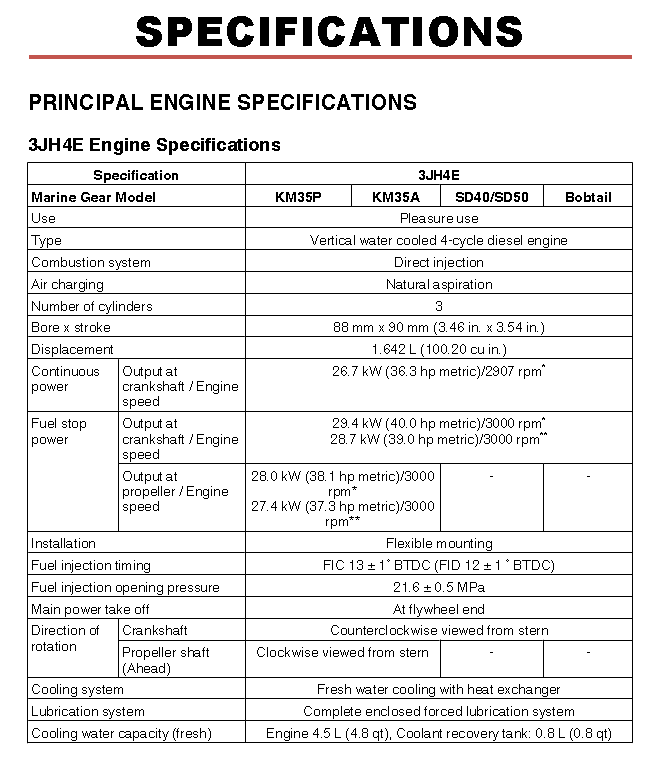
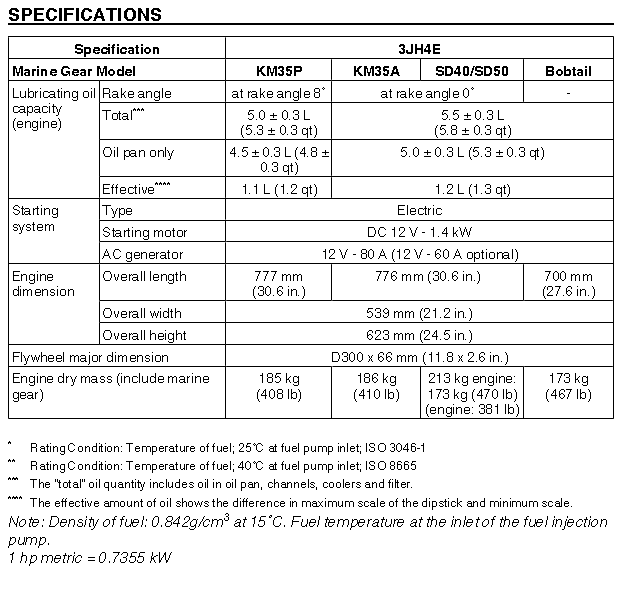
C387 boats have had two types of Yanmar engines — 3JH3xx and 3JH4xx.  Note that the 3JH3 engine has a much higher engine RPM to reach max horsepower than does the 3JH4.  Note also that this means that the transmission will also be different.  The change to 3JH4 engines took place around hull #60. The following is the specification for the 3JH4 engine:


You need to be logged in to see the rest of this content.  Catalina380-IA members, please login.

To join please fill out a membership application (Association->Membership Application) and send a check to the address on the form.

Yanmar 3JH3 Engine Specifications (C387)

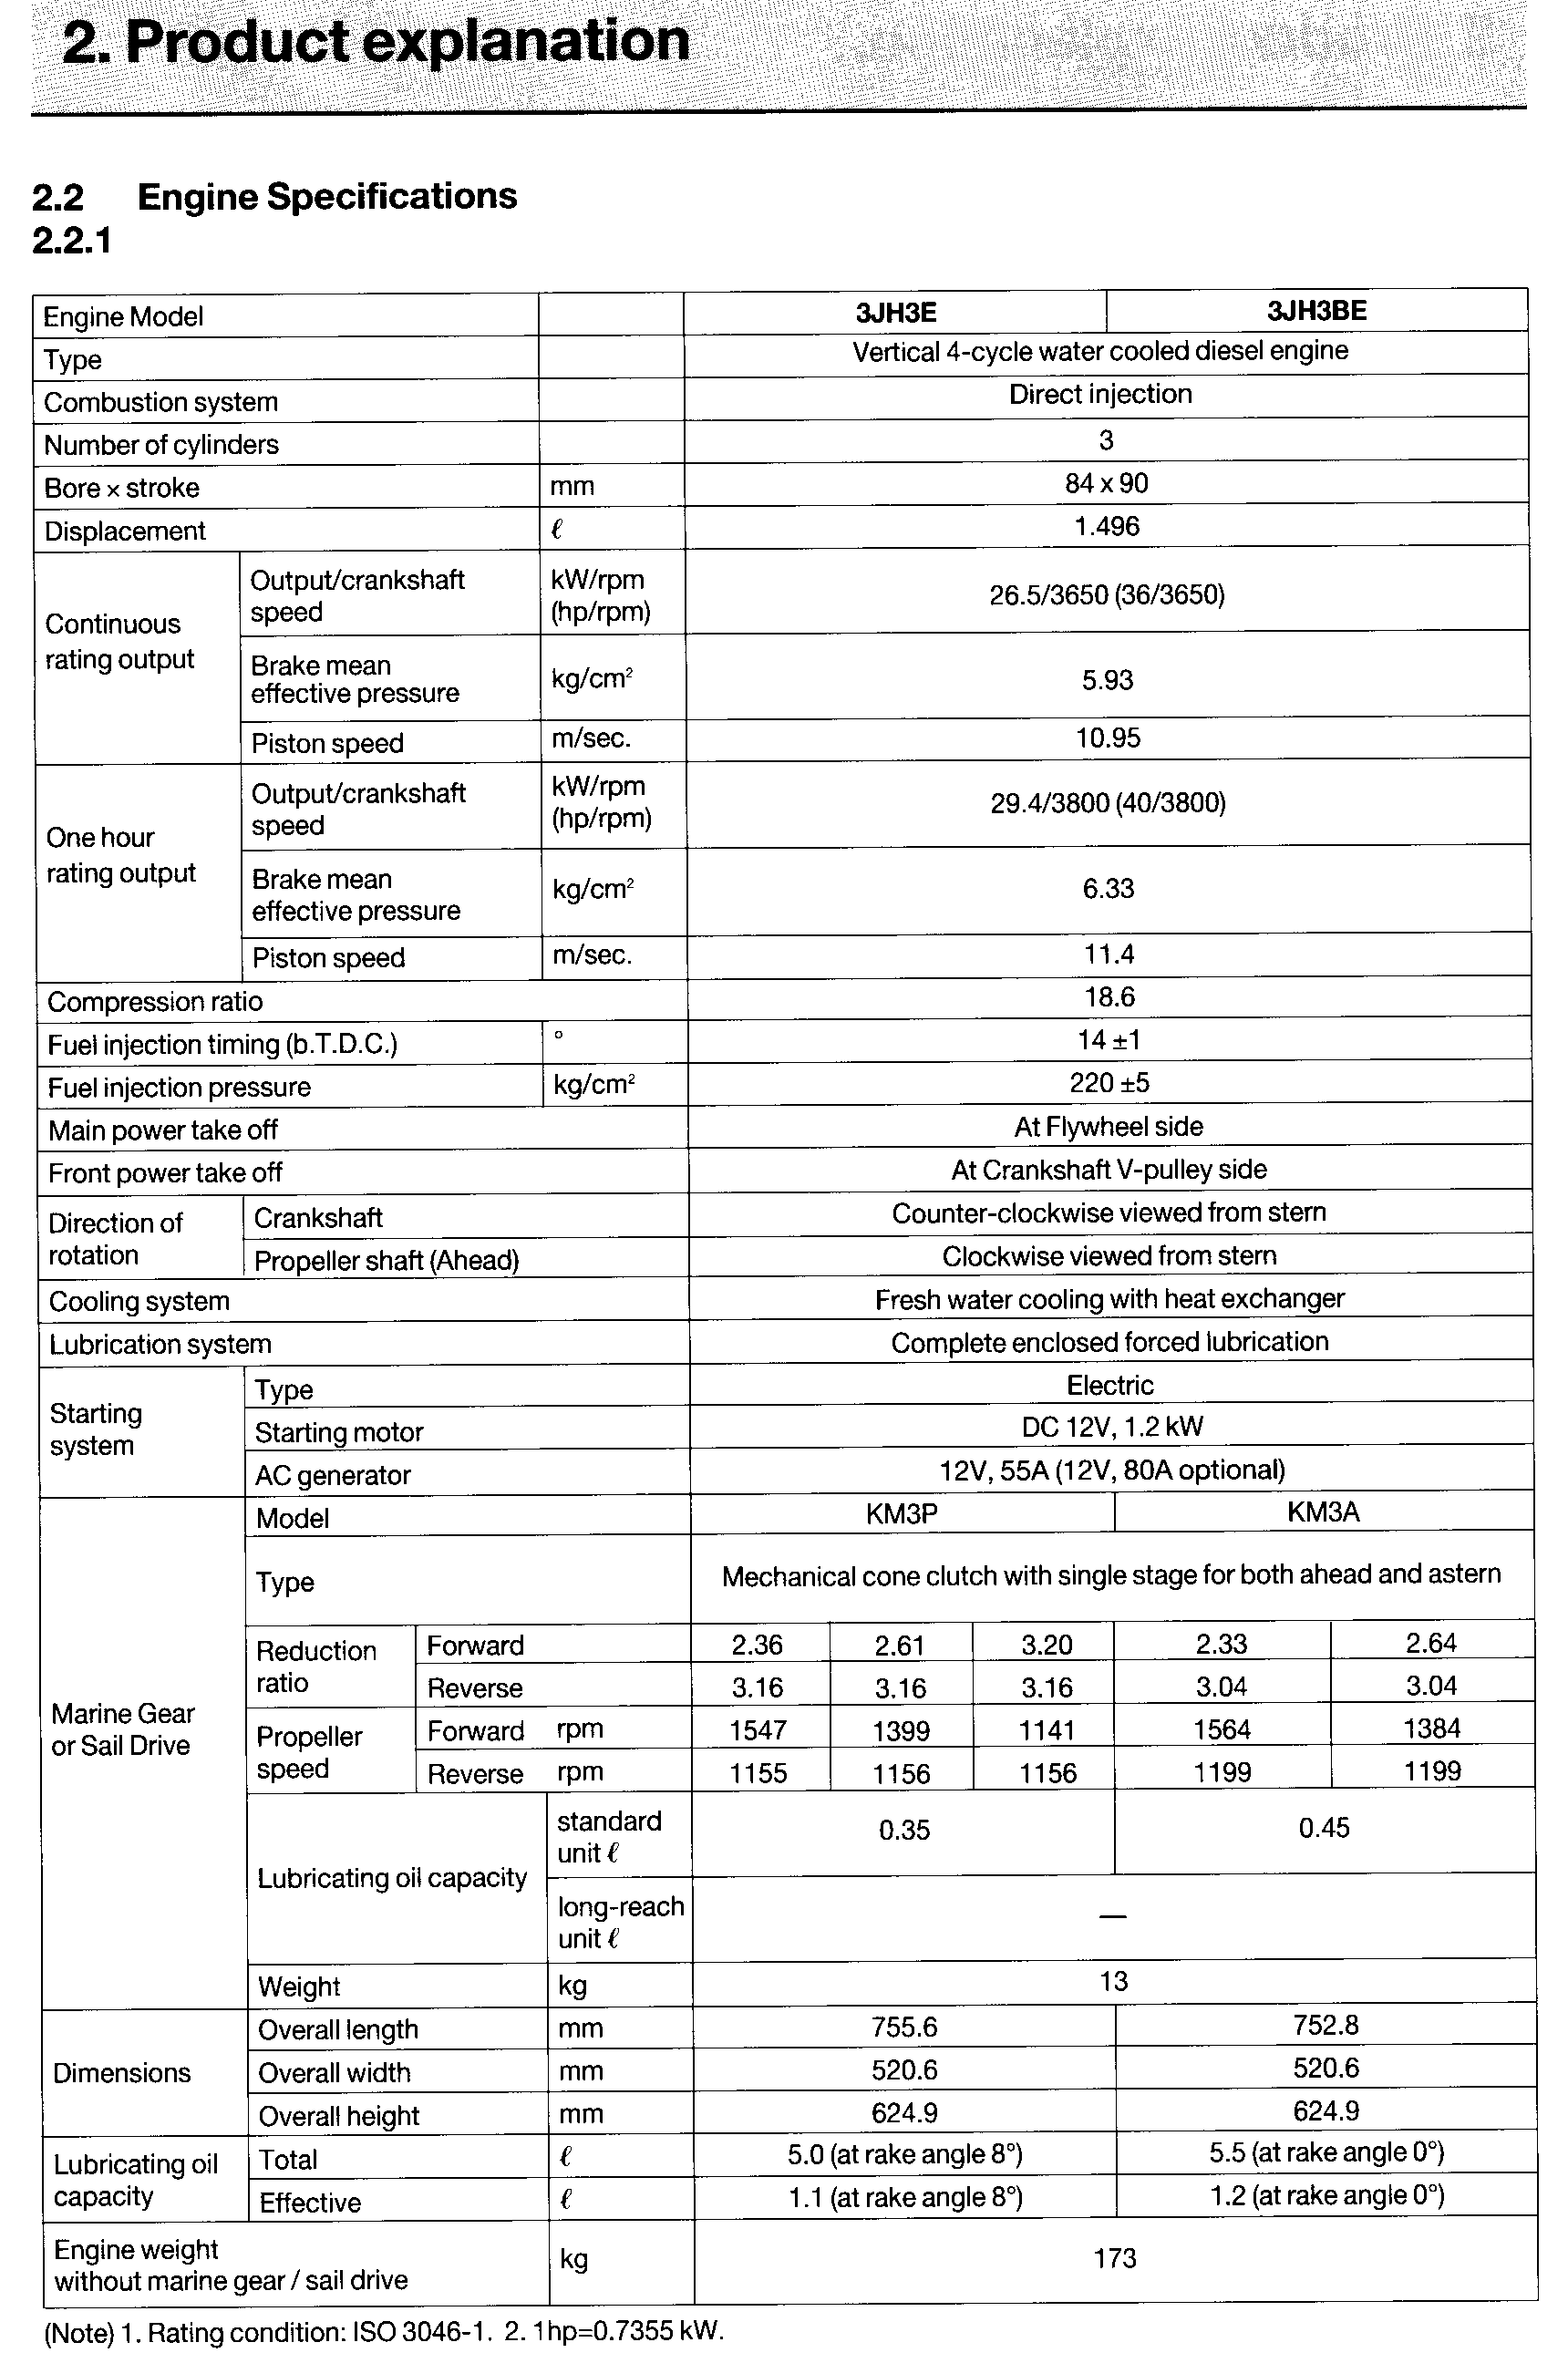
C387 boats have had two types of Yanmar engines — 3JH3xx and 3JH4xx.  Note that the 3JH3 engine has a much higher engine RPM to reach max horsepower.  Note also that this means that the transmission will also be different.  The change to 3JH4 engines took place around hull #60. The following is the specification for the 3JH3 engine:

You need to be logged in to see the rest of this content.  Catalina380-IA members, please login.

To join please fill out a membership application (Association->Membership Application) and send a check to the address on the form.