All posts by Webmaster

Engine Preventive Maintenance

Engine Preventive Maintenance
George LaForge
5/1/2004
Hull #: 147

Recently, on the SailNet C380 discussion list, there was mention of chaffing of engine hoses. You’ll appreciate the minimal expense and time involved in adding chaffing protection to your engine’s cooling and fuel hoses. If you need to purchase a replacement hose from Westerbeke or Yanmar, be prepared for sticker shock.

To protect the hoses, buy a few feet of one-inch diameter clear hose and a package of eight-inch plastic wire ties from Home Depot or Lowes. You’ll be surprised by the amount of hose needed. Inspect every hose for potential contact with other objects. Where one does touch [or might with vibration], cut a piece of the clear tubing long enough to protect the engine hose, split the tubing length-wise, and secure the tubing to the hose with a couple of wire ties. Trim the ties using wire cutters.

On

You need to be logged in to see the rest of this content.  Catalina380-IA members, please login.

To join please fill out a membership application (Association->Membership Application) and send a check to the address on the form.

Basic “Go-Fasts” For The C380

Basic “Go-Fasts” For The C380
Steve Dublin
5/1/2004
Hull #: 84

We’ve found our C-380, “Caretta” (hull # 84), to be a very able club racer, particularly in offshore events. When her skipper and crew are reasonably attentive, she can sail to her 120 PHRF rating.

The stock Catalina 380 comes well fitted out with sail handling gear. However, there are some basic “go fasts” (racing equipment), which can be easily added, to help the boat sail her to her full potential. I’ve described a few of these “go fasts” below along with some installation tips learned the hard way:

Adjustable Backstay 

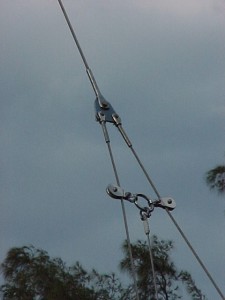
The C-380 does not have a “bendy” rig. However, a pincer block assembly (Photo 3), connected to a 4 to 1 block & tackle, will allow you to tighten the forestay and point a little higher in moderate sea conditions. You don’t have to drill any holes for

You need to be logged in to see the rest of this content.  Catalina380-IA members, please login.

To join please fill out a membership application (Association->Membership Application) and send a check to the address on the form.

More on Spinnaker & Jib Poles

More on Spinnaker & Jib Poles
Warren Elliott
5/1/2004
Hull #:      44 

As a follow-up to Steve’s article, I did some further enquiries on spinnaker/jib poles and cars. For the older C380’s with Z-Spar masts, Julian Crisp at US Spars [was Z-Spar, tel: 386 462-3760] indicates that, for the standard [non-furling] mast, the cost is about $250 for a car and short section of track. They also sell the same track in a long version [4 meters], for those who want to store their boat’s pole on the mast. US Spars’ furling mast uses a simpler approach in which the car can be added directly to the mast groove, and is about $170; installing this car does not require stepping the mast. They also sell complete poles with fittings, at better prices than the big catalog stores, per Julian. [But remember that shipping long items means that a trucking company

You need to be logged in to see the rest of this content.  Catalina380-IA members, please login.

To join please fill out a membership application (Association->Membership Application) and send a check to the address on the form.

Improving the C-380 Single Line Reefing System

Improving the C-380 Single Line Reefing System
Tom McMahn
8/1/2004
Hull #: 29

Many C-380 owners have complained about the single line reefing systems installed on our boats. I am no exception. The reefing system installed on many modern Catalina models, like those on most other production boats, is difficult to use and results in less than satisfactory reefed sail shape. Rigging the boat so reefing can be done from the cockpit is a great safety goal, but the implementation leaves a lot of room for improvement.

Tom McMahan clew block side

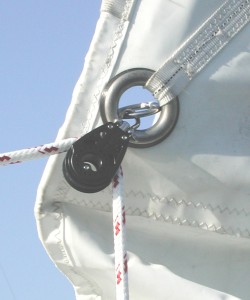
The friction created by the reefing line twice passing through the reef cringles, and that in all the blocks used to turn the line back to the cockpit, make taking a reef a real chore. Perhaps even worse, the same friction points make shaking out the reef nearly impossible without help from the halyard winch. [Note: any reef

You need to be logged in to see the rest of this content.  Catalina380-IA members, please login.

To join please fill out a membership application (Association->Membership Application) and send a check to the address on the form.

Alternator/Regulator Mods

Alternator/Regulator Mods
Jim Norman, Jos Sonneville
8/1/2004
Hull #:     33


We’ve had a lot of “traffic” on our Sailnet email discussion list on this topic. Modification of your engine’s alternator, to provide connection for a “smart” external regulator, can make the full alternator output available for your battery charging; otherwise, the typical alternator’s regulator will provide only about 1/2 of the available charging current.

The particular description here is applicable to the earlier C380’s that have the Westerbeke 42B engine, which includes a 72-amp alternator. The same concept will work for the Yanmar-equipped boats, although it’s smaller 55-amp alternator has less potential “reward”.

The alternator’s standard regulator is contained in a housing [aka: “doghouse”] attached to the back of the alternator. There are both “N” [negative] and “P” [positive] types, so named because of the electrical location of the regulator with respect to the alternator’s field winding. They require

You need to be logged in to see the rest of this content.  Catalina380-IA members, please login.

To join please fill out a membership application (Association->Membership Application) and send a check to the address on the form.

Check Those Thru Hulls

Check Those Thru Hulls
Randy Camp
8/1/2004
Hull #: 92

Check those Thru-Hulls!

Checking on things under the galley sink, I accidentally bumped the drain hose connected to the sink thru-hull when a semi-eruption of water (sea/lake) came forth. It did not matter whether the valve was open or shut. I checked to see if the bolts (4) were tight, and found that only one bolt was tight … the other three were loose and could be removed by hand. Apparently, the one bolt holding the whole valve assembly together was long enough (5-1/4) to reach the base of the valve assembly whereas the others (4-1/2) were not. I was able to correct the problem by installing three new 5-/1/4 machine bolts. Perhaps my past inspections didn’t catch this problem because some seating material was holding the screws, and has since loosened.<br> In any event, the valve was improperly installed

You need to be logged in to see the rest of this content.  Catalina380-IA members, please login.

To join please fill out a membership application (Association->Membership Application) and send a check to the address on the form.

Hatches – Screen Hinges

Hatches –  Screen Hinges
Warren Elliott
11/27/2004

Hull #: 44

We all want to make/keep all things simple, right? Well, definitely fitting this category are the relatively new screen hinges by Lewmar, manufacturer of our overhead hatches.

Admiral Jeanne and I always found it bothersome to remove, store and/or install the hatch screens. It was particularly irksome when a sudden rain shower required quick screen removal so that the hatch[es] could be closed. Also, when not in use they require storage space, which is particularly problematic for the very large forward unit.

The answer is to store the screens in-place while having a quick/easy opening and closing setup. Lewmar’s screen hinges fit the bill. The photo [see photo 1] shows our C380’s large hatch in the main cabin, with the screen open. [The view is towards the port quarter]. It’s held in place by a pair of the special hinges.

You need to be logged in to see the rest of this content.  Catalina380-IA members, please login.

To join please fill out a membership application (Association->Membership Application) and send a check to the address on the form.

Westerbeke Engine Issues

Westerbeke Notes
Warren Elliott
11/27/2004
Hull #: 44


A few notes for those of us with the Westerbeke 42B.

Raw Water Pump.


First, there is a new raw water pump, P/N 48080, which is a bit larger but directly replaces the old one, P/N 033636. From our Sailnet discussion group, here’s an email from one captain who went through the exchange: “The seals started to leak on my seawater pump so ordered a new one. Found out Westerbeke had replaced it with larger model. The frame and bolt holes match but the pump is larger, has a higher volume, and the impellers are not interchangeable. Just finished mounting the new one. Keep the 45-degree elbow on the inlet. The new pump comes with the 90 degree fitting on the outlet but not the 45. Everything fit and it works fine. Having the old one rebuilt for a spare. Don’t forget to close the seacock before you start this project.
Regards, Steve [Dublin] C-380 #84 Caretta”

Per Westerbeke, some repair parts and repair kits [P/N 034466] for the old unit are still available. Note that a new “kit” version of the new pump is P/N 37431, which also includes a mounting gasket and fittings. The repair kit for the new pump is P/N 49000.

Fuel Filter


For the primary fuel filter, most [all?] of us have a Racor 500 series water separator type. Many of our boats, including mine, came with 2-micron filter elements installed, and we replaced them, as needed, with the same filter size [10 and 30-micron are also available]. The 2-micron units are identified by their hard-to-see part numbers embossed on one end [2010SM-OR] and, more easily, by their brown color.

Westerbeke had been reviewing the filter’s specifications and fuel requirements, and revised their recommendation to 10-micron filtering. Apparently they had discovered some tendency for fuel pumps to fail due to excessive pressure drop in the fuel filters, which increases the suction on their pumps, thus reducing output pressure. Because the engine fuel particulates can be much significantly larger for proper operation, they are now [starting over a year ago] recommending use of a 10-micron filter [note that the secondary filter, built onto the engine, uses a 25-micron element].

The 10-micron replacement element is Racor P/N 2010TM-OR, and is noted by it’s blue color. West Marine’s P/N is 465674.

Circuit Breaker


A few captains have found their 42B’s inoperative, eventually tracing it to a tripped circuit breaker on the engine. This is the main 20-amp breaker, located on a vertical bracket, just aft and to starboard of the middle of the engine. Looking from the engine’s front, it’s just behind the air intake silencer [black] on the left top. The breaker’s reset button protrudes through that vertical bracket.

The circuit breaker’s purpose is to protect engine from short circuits, which obviously might damage wiring, other components, or even your boat. So by-passing or eliminating it is not the answer to an occasional trip of the breaker.
So why do a few 42B’s exhibit occasional circuit breaker tripping, without any apparent real fault? There was some concern that perhaps the nominal current was too near the 20 amp limit. I checked with Westerbeke on this and here is their reply:

“The typical engine running, amperage that will be seen through the breaker is about 4 to 5 amps if you are using a manual shut off cable. If the engine has an electric shut off the amperage will be 5 or so amps more. [Note–we have manual shut-off].

Please note that this breaker is a thermal switch [Note-it’s sensitive to both the heat generated by high currents and by high ambient temps–Warren]. It is characteristic of this type of switch to trip more frequently as it gets older if in fact it has been tripped due to an over current condition a couple of times. The switch is also susceptible to tripping if the engine compartment is hot. This is especially true after the engine has been shut down and it dissipates it’s heat. Often times folks will find this breaker tripped when re starting the unit after it has been sitting for a while. If so it is possible that it tripped after shut down.”

While few have any problem with the circuit breaker, it seems more likely to inadvertently trip for those operating in hot weather, with a relatively long engine run, when the engine compartment becomes very hot. Then, when the engine is shut down and cooling water no longer flows, engine and compartment temperature will tend to rise even higher as the engine dissipates it’s heat.

The most obvious suggestion for these type of circumstances is to run the engine compartment blower as long as necessary. This should significantly reduce engine compartment temperature. Unfortunately, the blower switch, which is located on our engine control panel, is not set up to operate with the ignition switch off—which may be just when we need it most. But it’s an easy mod to change the blower switch for anytime operation: simply move the hot side to the red +12V wire [make sure your main power/engine switch is off while making the change]. And, of course, you’ll now be subject to possibly leaving it on too long, running down the battery. So, either be extra careful [ask your admiral to remind you], or be extra fancy and add it a timer.

By the way, this mod could be helpful to all in very hot climes, providing some engine compartment cooling and therefore reducing heat added to the boat.

For those who feel they may have a real circuit breaker problem, Westerbeke’s P/N is 024683. Before ordering or changing the part however, I advise checking the circuit to determine if there is the nominal 4 – 5 amps flowing. If it’s significantly higher, locate and fix that problem–and do it soon as this sort of condition suggests a more serious issue is just around the corner.– Warren

Improving Genny Sheet Leads

Improving Genny Sheet Leads
Warren Elliott
 11/27/2004
Hull #: 44

The standard headsail sheets each lead through a track-mounted block and a cheek block before being led to a primary winch. While this is no problem under some conditions, when the wind pipes up, cranking the sheet winch, especially with my 155% jib, gets really tough. The added friction from the “wrap around” cheek block surely adds significant stress to this old sailor. To improve the situation, some have upgraded to ball-bearing blocks. Another approach is to lead the sheet more directly to it’s winch, as shown in the accompanying photo, courtesy Commodore Earle Ellefsen.

Here, his boat’s port genny sheet lead is shown. From the jib, the lead traverses the normal, moveable track-mounted block [not shown], then through a second block as shown, directly to the winch. This bypasses the cheek block, providing a much straighter lead with correspondingly

You need to be logged in to see the rest of this content.  Catalina380-IA members, please login.

To join please fill out a membership application (Association->Membership Application) and send a check to the address on the form.

Engine Seminars

Engine Seminars
Warren Elliott
11/27/2004 Hull #: 44

The mail reminded me that our engine manfacturers –actually theirdistributors–sponsor one-day seminars on diesel engines, including yourmodel. As non-sailing season approaches [for most of us, anyway], this is agood time to plan on attending one of these seminars. You’ll learn a lotabout diesels, and you can get answers to just about anything relevant. Costis generally $175.To find the nearest location, a list of dealers is available atWesterbeke.com and YanmarMarine.com Or call Westerbeke at 508 823-7677,Yanmar at 847 541-1900. Here in the northeast, Westerbeke’s Hansen Marine[MA] typically holds two “owner” seminars every quarter. Mack Boring [NJ,NC, MA & IL] has a similar schedule for their “maintenance” seminars onYanmar engines. — Warren

You need to be logged in to see the rest of this content.  Catalina380-IA members, please login.

To join please fill out a membership application (Association->Membership Application) and send a check to the address on the form.