All posts by Webmaster

Storage Ideas

Storage Ideas
Harvey Berman
11/1/2001
Hull #: 201

The following is from Harvey Berman, who has sailed his C380, ”Soultice” from Canada to Central America.

Dear Warren:

I have been intending to submit some modifications for some time but never had a proper camera or was in a location that was convenient. I am submitting these at this time, without photos as you have encouraged.

Photos can be supplied at a later date if required.

We own hull # 201. Our 380 was delivered to Swan’s Marina, Ontario, Canada in July of 1999. We immediately commissioned her and headed south for a two-year cruise, which included Central America. We had to have more convenient storage space. There is a lot of room on the 380 but not all usable. “Soultice” is presently on the hard near Tampa, Florida. I am going by memory, but can supply more detail this winter

You need to be logged in to see the rest of this content.  Catalina380-IA members, please login.

To join please fill out a membership application (Association->Membership Application) and send a check to the address on the form.

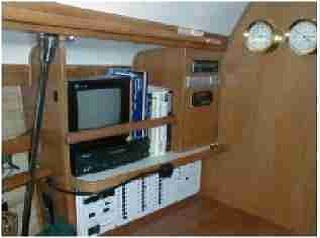
TV & Book Storage

TV & Book Storage
Ed and Sharyn Dahn

2/21/2001
Hull #: 111

One open project before our first cruise was to work out storage above the nav station for both the TV, video player, and books. This did not get done, and in the excitement of sailing for the first time the TV hit the deck. I am embarrassed to report that this happened not once, but three times. I must say that GE makes an extremely rugged TV, it still works perfectly, however, the cabin sole received a few nasty gouges. A book/TV retainer was made with the 1 ½ inch oak ½ round as shown below. Everything behind the retainer is secure and can be removed by lifting the item up and over the top.

You need to be logged in to see the rest of this content.  Catalina380-IA members, please login.

To join please fill out a membership application (Association->Membership Application) and send a check to the address on the form.

Valves Under the Sink

Under the Sink
Bob Bierly

11/1/2001
Hull #: 255

The newer C380’s have returned to vinyl hoses and have a much better arrangement for water tank management than my boat does. The new boats have the tank valves mounted on the bulkhead inside the below-sink door [as do the original 380’s, such as my #44-Ed]. All of my tank valves are mounted on the floor under the sink, along with the whale type plumbing.

Consequently I have built a second removable floor under the sink for pot and pan storage. The second floor has holes in it above each valve and an extension handle to turn those valves as needed without removing the floor and the paraphernalia. The floor is arranged on blocks and cleats to keep from loading the plumbing. The extension rods are 5/8” dowels cut to fit the water valves handles and protrude above the second floor.

You need to be logged in to see the rest of this content.  Catalina380-IA members, please login.

To join please fill out a membership application (Association->Membership Application) and send a check to the address on the form.

Vee Berth Shelves

Vee Berth Shelves
Bob Bierly

11/21/2001
Hull #: 255

I have constructed shelves along sides of the cabin above and resting upon the two inch wide shelves that the factory installed. My shelves are about 5 feet long, 12” deep, and with vertical separators about 10” high spaced about one foot centers end to end. Thereby, We have five one cubic foot pigeonholes filling the space between the somewhat useless pre-existing shelf and the overhead. The end pieces of the new shelves are thru-bolted into the windlass compartment at the bow end of each shelf and thru-bolted into the existing lockers at the aft end. The vee berth has no loss of sleeping area. BTW, the shelves can be removed with the removal of about eight bolts. In fact, these shelves were originally built for and installed in the Vee berth of a Catalina 34. The shelves were removed for

You need to be logged in to see the rest of this content.  Catalina380-IA members, please login.

To join please fill out a membership application (Association->Membership Application) and send a check to the address on the form.

Westerbeke 42B Engine – Upgrades & Start Proceddure

Westerbeke 42B Engine – Upgrades & Start Proceddure
Warren Elliott

Date: 8/1/2001 Hull #: 44

 WESTERBEKE 42B ENGINE

About 225 of the C380’s have the 42B engine, while later 380’s and all 390’s have the Yanmar 3JH3. Some of the early 42B’s initially developed internal overheating associated with the last two cylinders, causing permanent loss of compression and resultant hard starting or non starting.

Several upgrades were instituted early on by Westerbeke and Catalina, both of whom have been very responsive. Most, probably all boats already have theses changes. But, because there have been some questions on this appearing on Sailnet, mostly from second owners, I thought it would be appropriate to summarize these changes for some who may not be aware.

There have also been comments on the 42B’s starting procedure, so this is here, too. The latter is already on the 390-390 website: www.Catalina380.org, and the upgrades should

You need to be logged in to see the rest of this content.  Catalina380-IA members, please login.

To join please fill out a membership application (Association->Membership Application) and send a check to the address on the form.

Harken Electric Halyard Winch Installation

Harken Electric Halyard Winch Installation
Don Rooker
5/1/2000
Hull #: 44

For all of you 380 drivers, who are lazy like me, I have installed an electric winch in place of the two speed manual winch on the starboard side of the coachroof. It was really quite easy, but it did take a couple of days to complete.

I chose the Harken electric winch because it featured 2 speeds for both manual and electrical operation. The alternative from Lewmar, the OP1, that was used on Catalina 470, was only single speed for both mechanical and electrical, and it hung vertically rather than the tidy horizontal configuration of the Harken. The Harken kit part number is BK402STEC12.

EDITOR’S note: Lewmar has since discontinued the OP1. For a review of the new Lewmar alternative, the 40EST, see Scott’s article.

You should start the installation by removing the existing Lewmar 40.

Thoroughly clean

You need to be logged in to see the rest of this content.  Catalina380-IA members, please login.

To join please fill out a membership application (Association->Membership Application) and send a check to the address on the form.

Lewmar Electric Halyard Winch Upgrade

Lewmar Electric Halyard Winch Upgrade
Scott Brear

5/1/2000
Hull #: 44

I have been considering an electric halyard winch ever since I had a ride on a Catalina 470 a year ago. Not only does it make sail handling much easier, but it can act as a valuable safety aid (if rigged properly) in being able to hoist crew out of the water! In the Bay’s cold waters, timing can be critical.

Gerry (ANTSY #13) was kind enough to share his experiences in installing the Harken equivalent winch on a couple of boats, so I thought I would offer my version with Lewmar. The #40 EST is a new, geared, winch that replaces the much less capable OP1 but now discontinued. As the #40 EST is horizontal mounted below decks, the installation is very similar to the Harken. I selected the Lewmar because it matched the other winches and has

You need to be logged in to see the rest of this content.  Catalina380-IA members, please login.

To join please fill out a membership application (Association->Membership Application) and send a check to the address on the form.

Spreader Horizontal Position

Spreader Horizontal Position
Dave Peffer

1/1/2000
Hull #: 20

Greetings:

The drooping spreader problem appears to be occurring in several boats, so I passed this along to Gerry Douglas at Catalina, who designed the boat. He advises that the shrouds should be seized to the spreader tips with stainless steel wire, and this should have been done when the boat was commissioned, again if re-rigged. “Down angle is not correct and loads the spreader base excessively.” He further advises that trying to fix this with discontinuous rigging is “not the answer as it requires turnbuckles in all segments to compensate for stretch, unless done with rod.”

We would all be well advised to check that our spreaders are level, and that the shrouds have been well-fixed to the ends with wire. Gerry doesn’t say so directly, but “loads the spreader base excessively” reads to me like a threat of buckling

You need to be logged in to see the rest of this content.  Catalina380-IA members, please login.

To join please fill out a membership application (Association->Membership Application) and send a check to the address on the form.

Adding Insulation to Older C380 Refrigerators

Adding Insulation to Older C380 Refrigerators
Catalina Factory

August 29, 1997 Hull #: n/a

Procedure for Installing Additional Insulation to EARLY Refrigerators:

Some early Catalina 380’s may have void areas between the hull and the back of the refrigerators present insulation. Voids area will be found on both side as well as the frontal areas. Additional foam must be added to the bottom area, some sort of temporary cofferdam will be required in this area.

The following procedure will increase the “R” value of the refrigerator.

Please Take Note:

This procedure will require great care in the drilling and injecting of the foam. Caution will be required when drilling thru the refrigerator outboard face to the void area. Drilling too deep will contact the hull or hull liner. Use caution when injecting this foam. It can become very messy stuff. Clean with lacquer thinner or acetone immediately. All drilled holes

You need to be logged in to see the rest of this content.  Catalina380-IA members, please login.

To join please fill out a membership application (Association->Membership Application) and send a check to the address on the form.

Anchor Locker Lock

Anchor Locker Lock
Scott Brear
2/1/1999
Hull #: 0

Keeping the anchor locker closed, whether to prevent it from opening in a heavy sea or to keep thieves out of it, requires some kind of lock. One solution is a lockable hasp on deck, but a lock can be cut and it is a toe-banger. Some of us have taken an inside approach. It is quite practical to attach a ¼ inch line to the inside of the hatch (where the holding open cable is mounted) and run the line to a cleat in the v-berth. The photo shows the internal installation, using a stainless jam cleat. It is important that the hole be positioned just under its attachment to the locker lid where the line can be pulled the tightest. There must be no slack. I used a surface-mounted turning block in the locker at the exiting hole to

You need to be logged in to see the rest of this content.  Catalina380-IA members, please login.

To join please fill out a membership application (Association->Membership Application) and send a check to the address on the form.