Basic “Go-Fasts” For The C380 Steve Dublin 5/1/2004 Hull #: 84
We’ve found our C-380, “Caretta” (hull # 84), to be a very able club racer, particularly in offshore events. When her skipper and crew are reasonably attentive, she can sail to her 120 PHRF rating.
The stock Catalina 380 comes well fitted out with sail handling gear. However, there are some basic “go fasts” (racing equipment), which can be easily added, to help the boat sail her to her full potential. I’ve described a few of these “go fasts” below along with some installation tips learned the hard way:
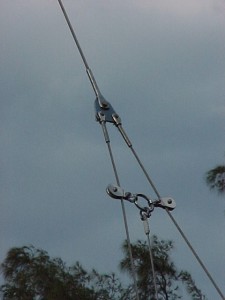
Adjustable Backstay
The C-380 does not have a “bendy” rig. However, a pincer block assembly (Photo 3), connected to a 4 to 1 block & tackle, will allow you to tighten the forestay and point a little higher in moderate sea conditions. You don’t have to drill any holes for
You need to be logged in to see the rest of this content. Catalina380-IA members, please login.
To join please fill out a membership application (Association->Membership Application) and send a check to the address on the form.
Engine Preventive Maintenance George LaForge 5/1/2004 Hull #: 147
Recently, on the SailNet C380 discussion list, there was mention of chaffing of engine hoses. You’ll appreciate the minimal expense and time involved in adding chaffing protection to your engine’s cooling and fuel hoses. If you need to purchase a replacement hose from Westerbeke or Yanmar, be prepared for sticker shock.
To protect the hoses, buy a few feet of one-inch diameter clear hose and a package of eight-inch plastic wire ties from Home Depot or Lowes. You’ll be surprised by the amount of hose needed. Inspect every hose for potential contact with other objects. Where one does touch [or might with vibration], cut a piece of the clear tubing long enough to protect the engine hose, split the tubing length-wise, and secure the tubing to the hose with a couple of wire ties. Trim the ties using wire cutters.
On
You need to be logged in to see the rest of this content. Catalina380-IA members, please login.
To join please fill out a membership application (Association->Membership Application) and send a check to the address on the form.
The following is from Earl Effelsen –Warren I have always kept a fuel log for our 2000 C380 (#271), Valkyrie, and know that fuel consumption can range from 0.6 to 1.0 gph (average 0.85 gph) depending on conditions. I am also well aware that the stock fuel gauge is not linear and that, although my tank is rated at 34 gals, when the gauge reads 1/4, there are only about four gals remaining. So, I was particularly annoyed when I recently ran out of fuel despite my calculations indicating that I should still have another hours worth of fuel.
At about this time, I saw an ad for the Cruz Pro FU30 Smart Fuel Gauge and ordered one from the e-Marine, Inc. web site for $169. This gauge learns the shape of the tank and, via its digital readout, can accurately
You need to be logged in to see the rest of this content. Catalina380-IA members, please login.
To join please fill out a membership application (Association->Membership Application) and send a check to the address on the form.
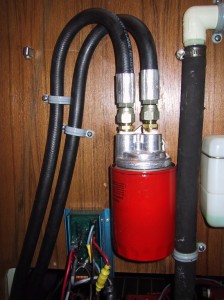
The oil filters on both of our fleets engine types [Westerbeke and Yanmar] are horizontally mounted, resulting in some oil spillage when changing filters. This remote adapter allows you to relocate the filter so that its feed/return end is up, avoiding any messy spills. Further, the filters location on our Westerbekes is a bit awkward, as Captain Earl Poe so aptly describes below, so the remote filter also allows for a much more “ergonomic” location. –Warren
The idea of a remote location for mounting an oil filter was first investigated by Tom Lincoln on Ridge Runner, so he gets the credit. The servicing of our oil filters is, to say the least, awful! Mounting the filter in a vertical direction on an easily accessible bulkhead would save time, knuckles, and the environment. Covich-Williams (800-833-3132) of Seattle sells just
You need to be logged in to see the rest of this content. Catalina380-IA members, please login.
To join please fill out a membership application (Association->Membership Application) and send a check to the address on the form.
Hatch And Portlight Issues Warren Elliott 2/1/2004 Hull #: 44
While most of us realize that our hatches and portlights will not last forever, on the other hand a certain, and at least moderate, period of trouble-free performance is expected for new equipment. This is apparently not the case with regard to crazing of the acrylic. To be sure there’s also problems with leaks–there always will be with any exposed openable equipment on a boat. But crazing, a natural, usually slow, deterioration of the acrylic where fine lines appear randomly, should not strike for a few years. And when it does, we should see only minor amounts adding slowly over the years. Of course, this will vary depending principally on exposure to sunlight, so those of you in southern climes are most susceptible.
However, quite a large group of your fellow captains have indicated significant crazing appearing in their acrylics,
You need to be logged in to see the rest of this content. Catalina380-IA members, please login.
To join please fill out a membership application (Association->Membership Application) and send a check to the address on the form.
Automating Refrigerator Startup and Shutdown with a Battery Combiner George LaForge 2/1/2004 Hull #: 147
We only run the refrigerator on Freebird when power is available from a charging source. That source is either dockside power or the engine alternator. I try never to run the refrigerator only from battery power. [George- maybe your fridge needs an insulation upgrade; Catalina has a procedure for installing expandable foam–Warren].
Not wanting to run down a battery, yet at the same time wanting to keep beverages cold, we developed a routine: as soon as the engine was started someone would need to go below and switch on the circuit breaker for the refrigerator. And after the engine was shut down someone would need to go below and switch off the breaker. Most of the time the problem was remembering to switch the breaker on when the engine was started.
One day while researching
You need to be logged in to see the rest of this content. Catalina380-IA members, please login.
To join please fill out a membership application (Association->Membership Application) and send a check to the address on the form.
Filters for Drains George LaForge 2/1/2004 Hull #: 147
Regular cleaning of the inline shower bilge strainer is a task that is easily moved down a to-do list. The strainer’s out-of-sight location under the head sink and the difficulty in twisting the filter can contribute to a lack of cleaning. A simple, next-to-nothing cost project to prolong the cleaning interval is to silicone caulk a piece of nylon window screen over the drain in the shower stall. A quick wipe of the screen with a piece of tissue removes materials and hair that would otherwise be trapped in the under sink strainer.
Measure and cut a piece of nylon window screen the same dimensions as the shower’s stainless steel drain cover. Run a thin bead of silicone caulk around the edge of the drain plate and a few of the bars in the grid. Press the screen onto the drain
You need to be logged in to see the rest of this content. Catalina380-IA members, please login.
To join please fill out a membership application (Association->Membership Application) and send a check to the address on the form.
Basic “Go-Fasts” For The C380 Author:Steve Dublin Date: 5/1/2004 Hull #: 84
We’ve found our C-380, “Caretta” (hull # 84), to be a very able club racer, particularly in offshore events. When her skipper and crew are reasonably attentive, she can sail to her 120 PHRF rating. The stock Catalina 380 comes well fitted out with sail handling gear. However, there are some basic “go fasts” (racing equipment), which can be easily added, to help the boat sail her to her full potential. I’ve described a few of these “go fasts” below along with some installation tips learned the hard way:
Adjustable Backstay The C-380 does not have a “bendy” rig. However, a pincer block assembly (Photo 3), connected to a 4 to 1 block & tackle, will allow you to tighten the forestay and point a little higher in moderate sea conditions. You don’t have to drill any holes
You need to be logged in to see the rest of this content. Catalina380-IA members, please login.
To join please fill out a membership application (Association->Membership Application) and send a check to the address on the form.
Lee Berths for the Aft Cabin Jos Sonneville 2/1/2004 Hull #: 33
This article is from Jos Sonneville, a C380 captain residing in Holland. He gets out into “blue water” environments and finds a better rough-water sleeping set-up is helpful.–Warren
The aft cabin with the wide, comfortable bed is not an easy place to sleep when sailing through the night especially with moderate or serious seas. While it is possible to use, for example, sail bags to create a space where you do not roll around, it is not ideal. So I had been thinking about creating two lee berths in the aft cabin, without structurally changing the cabin.
Photo 3 shows an artist’s impression of the concept I came up with: on top of the mattress custom-made canvas lee-cloth ‘cocoons’ are installed. They are fixed on the bed itself by 1-inch webbing that is passed through stainless steel loops
You need to be logged in to see the rest of this content. Catalina380-IA members, please login.
To join please fill out a membership application (Association->Membership Application) and send a check to the address on the form.
The mail reminded me that our engine manfacturers –actually theirdistributors–sponsor one-day seminars on diesel engines, including yourmodel. As non-sailing season approaches [for most of us, anyway], this is agood time to plan on attending one of these seminars. You’ll learn a lotabout diesels, and you can get answers to just about anything relevant. Costis generally $175.To find the nearest location, a list of dealers is available atWesterbeke.com and YanmarMarine.com Or call Westerbeke at 508 823-7677,Yanmar at 847 541-1900. Here in the northeast, Westerbeke’s Hansen Marine[MA] typically holds two “owner” seminars every quarter. Mack Boring [NJ,NC, MA & IL] has a similar schedule for their “maintenance” seminars onYanmar engines. — Warren
You need to be logged in to see the rest of this content. Catalina380-IA members, please login.
To join please fill out a membership application (Association->Membership Application) and send a check to the address on the form.