I wanted to share with all of you the outcome of the companionway hatch
cover that I wrote about a few weeks ago. Here is what I said at the time.
Mine, a 2000, hull 226, I guess is what Warren described as the “old” slider
version, which is all smoked acrylic. I have a similar problem –hatch
sticks and, depending on the weather, it is almost impossible to open and
close. Two companies in the yard (general maintenance and a fiberglass
expert) have looked at the hatch and the hatch frame and both concluded that
the “sticking” problem is caused by a structural problem with the framing.
According to both, the cabin hatch frame has a wood base that the hatch
frame screws into. According to one person who looked at the framing, a
certain amount of non-orthodox adjustments were made to build up the frame
to accommodate the
You need to be logged in to see the rest of this content. Catalina380-IA members, please login.
To join please fill out a membership application (Association->Membership Application) and send a check to the address on the form.
I replaced the 1” pedestal guard with a Navpod 1.25 inch. It included the feet while the Edson feet are extra cost I believe. I got the AG126 which is about a 13 inch offset. I think I could have used the AG125 which is about 9 inch offset and reduced the footprint over the table. I had a C90W on the lower angled section and the instrument pod on the upper section of the pedestal guard. I also replaced the plate below the compass with the one from navpod which is stainless. At first I tried to drill the aluminum top plate but did not get a clean hole. Also by using the Navpod stainless steel top plate I will not get any galvanic action. It is isolated at the compass with gaskets. (Navpod TP125 top plate and was about $85
You need to be logged in to see the rest of this content. Catalina380-IA members, please login.
To join please fill out a membership application (Association->Membership Application) and send a check to the address on the form.
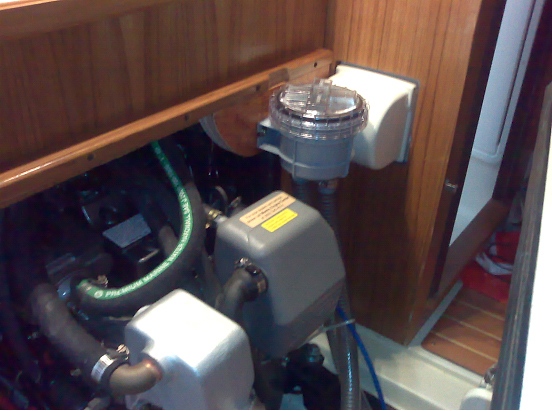
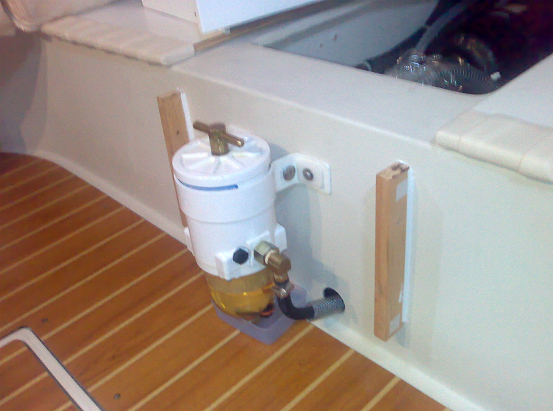
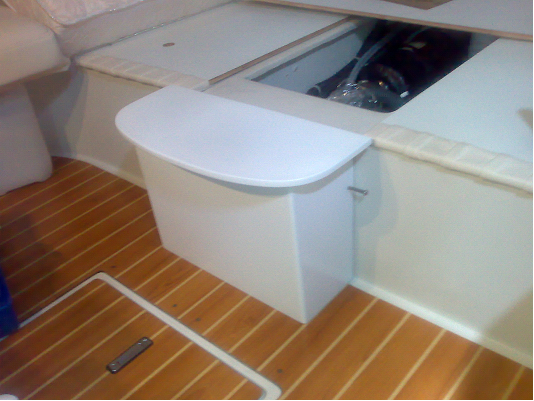
The engine water strainer was originally located under the berth where it was extremely difficult to reach, which can be dangerous in an emergency. The same was true for the primary fuel filter. The water strainer was replaced (and exchanged against an all plastic Vetus model (no rust) into the engine compartment. It sits now just above the waterline and can be easily cleaned without closing the sea cock. The fuel filter was brought outside the berth and a cover was made to protect it from being accidentally hit. The cover also makes a nice stool in front of the mirror. The stool is not too deep, thus still enabling a unobstructed passage between mirror and berth. Under the stool is a place for spare fuel filters and a prime pump in case the filter has to be primed.
Editor’s notes: The Racor relocation shown is based
You need to be logged in to see the rest of this content. Catalina380-IA members, please login.
To join please fill out a membership application (Association->Membership Application) and send a check to the address on the form.
It is hard to believe that summer is over and we are heading into the fall sailing season. We had a late start this year due to family matters. Then the proliferation of 100+ degree days made sailing and any exterior projects very uncomfortable. In fact, I just got my new 135% genoa up, which was delivered in April, on a relatively cool day this past week and used it for the first time today. Definitely makes tacking down theYork Rivermuch easier and adds about 5 degrees pointing capability versus the old, baggy 150.
I will report that one of my winter projects has performed wonderfully over the summer. That project was adding a vent in the starboard lazerette with a 12V pancake exhaust fan wired to run with the refrigeration compressor. This simple project has completely eliminated the “boat smell” that used to emanate from the
You need to be logged in to see the rest of this content. Catalina380-IA members, please login.
To join please fill out a membership application (Association->Membership Application) and send a check to the address on the form.
After about 10 years of light use of our shower, the sealant failed at the bottom of the wall in which the shower door is mounted. This resulted in water getting trapped along the bottom edge between the inner and outer seal of that wall. This only became noticeable when I was trying to replace the factory-installed sealant that had started to crack along its full length just below the shower door area in the head area. When trying to remove the old sealant, the Formica covering the area blistered off because the water leak had broken the bond between the wall material and Formica (see Photo 1). The real damage probably occurred during winter lay up when the boat is blocked nose up. This nose-up attitude causes any small amount of water or snow leaking into the shower
You need to be logged in to see the rest of this content. Catalina380-IA members, please login.
To join please fill out a membership application (Association->Membership Application) and send a check to the address on the form.
My boat did not come with any type of latch or bumper to keep the head door from swinging into the shower doorframe. So the door was always left closed. However, while in a seaway, the latch would work and the door would eventually swing open. The head door handle would then start banging into the shower door frame and eventually put a dimple in the shower’s aluminum doorframe. This did not seem healthy to any of the parts involved. I evaluated the cost and appearance of standard doorstops available in marine and hardware stores. Nothing looked right and the marine stuff cost well over $50, more than I wanted to spend. After some creative pondering, I came upon the idea of using a white eraser. I cut it to a pleasing shape and mounted it to the shower
You need to be logged in to see the rest of this content. Catalina380-IA members, please login.
To join please fill out a membership application (Association->Membership Application) and send a check to the address on the form.
I get tired of the tangle of genoa sheet tails in the cockpit. They usually end up at the ends of the “T”, but they still get under foot and in the way. I also find the cockpit bins are too far forward to stow and easily reach winch handles from the helm area when tacking short-handed. I started looking at various options for pre-made sheet bags and various winch handle holders, but did not find anything that fit the bill. I have a canvas sewing machine so I also looked at making the bags mysef, including a kit from Sailrite. However, I quickly figured out I could just buy the materials and save some money versus the kit. Plus I could custom fit the bags to the “T” ends and include a pocket for the winch handles to
You need to be logged in to see the rest of this content. Catalina380-IA members, please login.
To join please fill out a membership application (Association->Membership Application) and send a check to the address on the form.
This month we have two articles regarding portlight and hatch issues that tend to plague our C380’s. First, is an article from Captain Tim Porter on sealing those bothersome leaks around the Lewmar side ports. I can relate to this one and remember the rainy delivery cruise up the ICW when I bought Blue Heron. My crewman assigned to the middle cabin had a series of plastic cups positioned under the ports to collect the drips so he could keep his bunk and gear dry. We weren’t able to get pictures of the fix in time for publication, but I think Tim’s description is clear without. Second, is an article from Captain Skip Wilkins on replacing the plexiglass companionway slider with Starboard. It is a different approach versus trying to retrofit a fiberglass C387 slider onto the C380.
As always, I am looking for new ideas, or
You need to be logged in to see the rest of this content. Catalina380-IA members, please login.
To join please fill out a membership application (Association->Membership Application) and send a check to the address on the form.
By: Tim Porter, C-380 #199 “Serendipity”
Mainsheet – August 2010
If you have an older Catalina, your Lewmar portlights are likely what are known as the “Old Standard” portlight. (note: these are NOT the overhead hatches, which are “Ocean” series hatches) These portlights can be identified by the split in the upper and lower frames on each side. If you have these portlights, you have probably been battling hard-to-find leaks. [My 1999 vintage C380, #194 still has the “Old Standard” ports. – Steve]
Most of these leaks are not from the seal or the latches, but rather from those splits in the frame I noted above. The frame itself is a hollow extrusion and the two halves are joined with a plastic insert that is pressed into them which is then staked into place by dimpling the backside of the frame. Over time, the sun and age takes its toll
You need to be logged in to see the rest of this content. Catalina380-IA members, please login.
To join please fill out a membership application (Association->Membership Application) and send a check to the address on the form.
The sliding companionway hatch on “Bellatrix” C380 #43 was made of ½ “ smoked Lexan or Plexiglas and had become crazed and sagged. The sagging allowed water to lay on it and it had become very hard to slide. Looking for an alternative, I called Warren Pandy at Catalina. He told me they no longer made the Plexiglas slider but now made them of fiberglass and the new material eliminated the problems of the old. I ordered the new slider. After I received it and took it to the boat I noticed a couple of problems. The new hatch was domed and would not fit under the sea hood. It would require cutting the sea hood, raising the sea hood and trimming the new slider (See Photos 1 and 2). The color of the nonskid on the new slider was a fresh seagull gray
You need to be logged in to see the rest of this content. Catalina380-IA members, please login.
To join please fill out a membership application (Association->Membership Application) and send a check to the address on the form.