Companionway Door Options Author:Warren Elliott 8/1/2005 Hull #: 44
Mainsheet August 2005
Hi C380+ Captains, Admirals and Crews–
Here in the N.E,. thankfully, the new season is in full swing, with nice warm temps and some fair winds. Trust you’re all enjoying sailing. But, if anything is preventing your getting-out-there boat-wise, please contact me or sign into our Sailnet.com email discussion list where there’s a lot of captains ready to help.
This Mainsheet issue is devoted to four companionway treatments, most of which are “doors”. I must confess that I received much of the info a couple of years ago, so some of it is a bit dated, but still applicable. My apologies to the four captains, who may have expected to see their handiwork “somewhat” earlier. The first article is a fairly detailed one from Tom and Barbara Lincoln, who were sailing in the Bahamas. Lately, they are “sailing”
You need to be logged in to see the rest of this content. Catalina380-IA members, please login.
To join please fill out a membership application (Association->Membership Application) and send a check to the address on the form.
Our Commodore, Earle Ellefsen [C380 #271, Valkyrie], discovered chafe near one end of his mainsail furling line. He decided to turn the line end-for-end, and remove the chafed area as there was excess line length. The key step in accomplishing this was to remove the bolt, which locks-in the furling line, near the bottom of the furler. Of course, an “opportunity” soon arose when Earle realized that the bolt was Stainless Steel in an aluminum furler and, with a few years of salt-water environment, was thoroughly corroded in-place. Many shots of WD-40 later, nothing had changed! Early attempts at removal quickly resulted in losing the slot– or, as Earle put it: “it torqued open”. Obviously the bolt should have had a more substantial gripping head.
Once the slot was destroyed, heavy locking pliers are the obvious choice, right? Wrong– their
You need to be logged in to see the rest of this content. Catalina380-IA members, please login.
To join please fill out a membership application (Association->Membership Application) and send a check to the address on the form.
Maxwell Windlass There’s been quite a lot of discussion on our email list concerning operating problems with our windlasses. These are principally the clutch not releasing, jamming when rope/chain splices transit the chainwheel with the “Freedom” version and failure/stalling of the unit.
To release “stuck” clutches, some captains have had to undertake some severe hammer work, as advised by Maxwell. The answer here seems to be proper maintenance, with at least annual cleaning and greasing required. The rope/chain splice problem is best minimized by having a good, professional “thin” splice made up. Some captains report that pulling the anchor line during the critical splice transit helps. A great way around both of these issues is to go to an all chain rode and add a down switch. This way, there is no splice to jam, and the clutch never needs adjusting, just
You need to be logged in to see the rest of this content. Catalina380-IA members, please login.
To join please fill out a membership application (Association->Membership Application) and send a check to the address on the form.
Title:Boat Speed Under Power Author:Jim Jaeschke Date: 5/1/2005 Hull #: 73
Boat Speed Under Power – Engine/Transmission/Propeller Performance There has been a few lively discussions on the Sailnet C380+ list about how fast and at what RPM our boats will move under engine power. The bottom line is that your boat should cruise at 7+ knots at engine rev’s that promote long life. I’ll try to help you get there by discussing prop characteristics, tying in engine performance and, for the practical side: tachometer and boat speed instrumentation.
Instrumentation In order to know our boat’s motoring performance, we need reasonably accurate instrumentation. It has been reported that the tachometer on some boats has not been calibrated, resulting in erroneous RPM readings. It is important, not only for this discussion but also for engine life, that the tach indicate engine RPM correctly. If you suspect a problem, have your boat yard
You need to be logged in to see the rest of this content. Catalina380-IA members, please login.
To join please fill out a membership application (Association->Membership Application) and send a check to the address on the form.
Dutchman Boom Brake Installation and Use Kevin Murray Mainsheet Date: 5/1/2005 Hull #: 88
The Dutchman Boom Brake is designed to control the speed of the boom as it crosses the boat during jibing. This can be a dangerous situation in moderate or higher winds. It also makes a great preventer for use when running downwind. As shown in Figure 1, this brake consists of three sheaves mounted between two plates in a triangular configuration; a line wraps around these in a serpentine fashion. The two upper sheaves are fixed and do not rotate; the lower sheave either rotates or is fixed depending on the setting of the control knob on the front of the device.
When the line running through the brake is tensioned, it grips the line with greater tension yielding more grip. By adjusting the knob and/or tension, more or less braking friction is in winds below
You need to be logged in to see the rest of this content. Catalina380-IA members, please login.
To join please fill out a membership application (Association->Membership Application) and send a check to the address on the form.
After another great weekend of sailing, snorkeling, barbequing, and general partying at Emerald Bay at Catalina Island, getting ready to go home is a drag. We start the routine around 11:30, to wait for the predictable San Pedro Channel trade winds to fill in. First, we retrieve and put away the flopper stopper, then I stow the Honda generator, and the eight horse Yamaha, haul the kayaks aboard, and uncover the main. Last but not least is the dinghy.
I used to tow my 10 foot inflatable Quicksilver and take care of it when I got to home port. But I didn’t like the effect it had on my sailing performance. I hauled it aboard and laid it on the foredeck a few times, but up there it gets in the way and is a
You need to be logged in to see the rest of this content. Catalina380-IA members, please login.
To join please fill out a membership application (Association->Membership Application) and send a check to the address on the form.
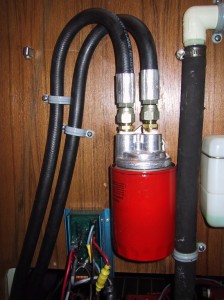
The oil filters on both of our fleets engine types [Westerbeke and Yanmar] are horizontally mounted, resulting in some oil spillage when changing filters. This remote adapter allows you to relocate the filter so that its feed/return end is up, avoiding any messy spills. Further, the filters location on our Westerbekes is a bit awkward, as Captain Earl Poe so aptly describes below, so the remote filter also allows for a much more “ergonomic” location. –Warren
The idea of a remote location for mounting an oil filter was first investigated by Tom Lincoln on Ridge Runner, so he gets the credit. The servicing of our oil filters is, to say the least, awful! Mounting the filter in a vertical direction on an easily accessible bulkhead would save time, knuckles, and the environment. Covich-Williams (800-833-3132) of Seattle sells just
You need to be logged in to see the rest of this content. Catalina380-IA members, please login.
To join please fill out a membership application (Association->Membership Application) and send a check to the address on the form.
Hatch And Portlight Issues Warren Elliott 2/1/2004 Hull #: 44
While most of us realize that our hatches and portlights will not last forever, on the other hand a certain, and at least moderate, period of trouble-free performance is expected for new equipment. This is apparently not the case with regard to crazing of the acrylic. To be sure there’s also problems with leaks–there always will be with any exposed openable equipment on a boat. But crazing, a natural, usually slow, deterioration of the acrylic where fine lines appear randomly, should not strike for a few years. And when it does, we should see only minor amounts adding slowly over the years. Of course, this will vary depending principally on exposure to sunlight, so those of you in southern climes are most susceptible.
However, quite a large group of your fellow captains have indicated significant crazing appearing in their acrylics,
You need to be logged in to see the rest of this content. Catalina380-IA members, please login.
To join please fill out a membership application (Association->Membership Application) and send a check to the address on the form.
Automating Refrigerator Startup and Shutdown with a Battery Combiner George LaForge 2/1/2004 Hull #: 147
We only run the refrigerator on Freebird when power is available from a charging source. That source is either dockside power or the engine alternator. I try never to run the refrigerator only from battery power. [George- maybe your fridge needs an insulation upgrade; Catalina has a procedure for installing expandable foam–Warren].
Not wanting to run down a battery, yet at the same time wanting to keep beverages cold, we developed a routine: as soon as the engine was started someone would need to go below and switch on the circuit breaker for the refrigerator. And after the engine was shut down someone would need to go below and switch off the breaker. Most of the time the problem was remembering to switch the breaker on when the engine was started.
One day while researching
You need to be logged in to see the rest of this content. Catalina380-IA members, please login.
To join please fill out a membership application (Association->Membership Application) and send a check to the address on the form.
Filters for Drains George LaForge 2/1/2004 Hull #: 147
Regular cleaning of the inline shower bilge strainer is a task that is easily moved down a to-do list. The strainer’s out-of-sight location under the head sink and the difficulty in twisting the filter can contribute to a lack of cleaning. A simple, next-to-nothing cost project to prolong the cleaning interval is to silicone caulk a piece of nylon window screen over the drain in the shower stall. A quick wipe of the screen with a piece of tissue removes materials and hair that would otherwise be trapped in the under sink strainer.
Measure and cut a piece of nylon window screen the same dimensions as the shower’s stainless steel drain cover. Run a thin bead of silicone caulk around the edge of the drain plate and a few of the bars in the grid. Press the screen onto the drain
You need to be logged in to see the rest of this content. Catalina380-IA members, please login.
To join please fill out a membership application (Association->Membership Application) and send a check to the address on the form.